


All code from this tutorial can be found here.
After completing this tutorial you should be able to:
Use functions, structs, and pointers in Go
Create linked lists
Traverse the linked list, find its length and print out the nodes in the linked list
Insert nodes into the linked list
Delete nodes from the linked list
Do in-place insertions and deletions
Understand the mechanism of deletion in Go
The What:
Arrays are great when a continuous block of memory is available. But when it isn’t, linked lists for the win.
Linked Lists are quite simple data structures really. Each node in the list has 2 fields:
The data: Stores the actual data that needs to be stored (English can be funny).
The address: Stores the address to the next node in the linked list. The last node in the list stores null in its address field.
 Figure 1: Each Node in the linked list stores Data and the Address of the next node in the list.
The How:
Before we get into the nitty-gritty of linked lists in Go, it's good to bring everyone onto the same page. This first section will teach you the basics of Go needed to get started with Data Structures in Go.
Go is all about type. — Todd Mcleod
A crash course in Golang:
Note:
- The go language specification document is your best friend. Whenever you have doubts, questions or want to know more about how something is done in go , refer to the language spec. It can be found here: https://golang.org/ref/spec
- The effective go document is helpful as well. The language used in effective go is easier to understand than the language specification. Effective go: https://golang.org/doc/effective_go
- Go by example is a good website for quickly looking at simple examples on various go statements: https://gobyexample.com/
- To test go code snippets: https://play.golang.org/
Variables: In go, variables can be declared and initialized in 2 ways:
:= (short variable declaration)

var <identifier> <type>
Example of declaring and initializing variables in go: https://play.golang.org/p/-ylCejvzAf5
The default initial value assigned to variables in go is called the zero value of the variable. More about zero values here: https://golang.org/ref/spec#The_zero_value
Types: Like other languages, go has built-in primitive data types (called types in go) like int32, float32, and bool. But even arrays, slices (dynamically allocated arrays), and structs are types in go. What this means is that the underlying ‘type’ of an array of size 3 is different from an array of size 4. Here is a demo of types in go: https://play.golang.org/p/FUyQV3kfnMa
It takes time to wrap your head around this because, in other languages like python, 2 lists(array equivalent in python) are of the same type i.e. list regardless of the size of each list. To learn more about types in go look at the language specification here: https://golang.org/ref/spec#Types
Printing: Basic printing functions in go are in the ‘fmt’ package. To import packages, the import <package-name> statement is used. In this tutorial, we will be using the fmt.Println and fmt.Printf functions. Documentation of the fmt package can be found here: https://pkg.go.dev/fmt?utm_source=godoc
Structs: Syntax for struct creation in go is
type <identifier> struct {
  <identifier> <type>
  <identifier> <type>
}
Documentation for structs can be found here: https://golang.org/ref/spec#Struct_types
Looping: Go doesn’t have the while and do while keywords. Looping in go is done through the for loop. Both for and while loops can be defined using the for keyword and do-while loops don't exist.
//Basic for loop
for i:=0; i<=n; i++{
  //some statements
}

// While loop
i:=0
for i<=n{
  // some statements
  i++
}

// Infinite loop
for {
  // some statements
}

// Other ways to define the loop
i:=0
for ; i<n; i+=10{
  // some statements
}
For more info on looping in go: https://golang.org/doc/effective_go#for
Conditional statements: Go has if-else and switch statements for testing conditions. For this tutorial we only need to know about the if-else statements.
if condition {
  // some statements
} else if condition {
  // some statements
} else {
  // some statement
}
For more examples: https://gobyexample.com/if-else , https://gobyexample.com/switch
Pointers: Pointers in go are created using the & and * operators. Here is an example of using pointers in go: https://play.golang.org/p/X5Va1Wl8OzG
Functions: Basic syntax for writing functions in go is
func <identifier> (<parameters>) <return type> {
  // operation
}
Here is a basic example for functions in go: https://play.golang.org/p/djYwzrHJ0n6
Functions in go are always call by value. There is no call by reference in go.
If you look at the language spec for functions you will see more complex things that can be done with functions in go such as methods, anonymous functions, callbacks, variadic function parameters, etc. But for now, we don't need to get into that. I will cover those topics sometime in the future.
Now is a good time for a break, because
The reason you’re here:
The struct for a node in the linked list will be defined as follows:
The linked list defined above has 2 fields
Dataof typeint: Zero Value is 0Nextof type pointer toNode: Zero Value is nil
And that’s all we need to start creating linked lists.
Note: I have seen other articles that use an additional struct for defining the linked list other than the node. I’m of the opinion that we don’t need an additional struct for the linked list. We should be able to do all the linked list operations using only the Node struct. This way it is easier to draw comparisons on how these data structures are written in C or C++ since that is usually how data structures are taught in schools (in India atleast).
There are 3 basic operations that we can define for linked lists:
Traversal: Accessing elements in the linked list
Insertion: Adding new nodes to the linked list
Deletion: Deleting nodes from the linked list
Traversal:
This function takes as input a pointer called head that points to type Node . To traverse all we need to do is run a loop that checks if head is not nil, and move along the list by changing head to point to the next node using the Nextfield.
Similarly, the function to calculate the length of the list can be written as:
Insertion:
Inserting at the end:
We first create a new node with its Data field storing the input integer x and assign nil to its Next field (we can also do tmp:= Node{Data:x} and nil will automatically be assigned to Next ). We then use a temporary variable current and assign the value of head to it. We will use current to traverse the linked list. Once we reach the last node of the list, all that needs to be done is to assign the address of tmp to the current.Next and return head .
But what if we want to do this insertion in-place? i.e. modify head such that we don't need to return anything back to the calling function.
For that, we use a pointer to head . The function changes to
This function is a bit tricky at first, but once the basics are understood it's quite simple. Here the function parameter head is a pointer to a pointer of type Node. This means that head stores the address of a pointer which in turn stores the address of a Node . Any modification to *head changes the original pointer in the calling function making this an in-place operation. Easy right!!
Putting them together with a few helpful print statements,
The output this function would produce will be something along the lines of
In InsertAtEndInPlace:
Inserting {2020 <nil>} at the end
Address of head node 0xc00009e220
Address of head pointer  0xc0000b8018
Returning
Adderss of node p 0xc00009e220
Address of pointer p  0xc0000b8018
The list is: 2020

In InsertAtEnd:
Inserting {1234 <nil>} at the end
Address of node 0xc00009e220
Address of head pointer  0xc0000b8028
Returning
Adderss of node p 0xc00009e220
Address of pointer p  0xc0000b8018
The list is: 2020 1234
Have a look at the address of the pointer p (0xc0000b8018)and the address of the node p points to (0xc00009e220). When calling the in-place version of the insert function, the address of the head pointer is the same as the address of the pointer p (both are 0xc0000b8018). Also, the address of the node that bothp and head point to (0xc00009e220) is also the same.
In the non-in-place version of the insert function, the address of the node head and p point to is the same as before (as expected). But the address of the head pointer (0xc0000b8028) and address of p (0xc0000b8018)are different. This is because all functions in go are call by value. A new variable head is created in the InsertAtEnd function and the value of p is copied into it.
Also, have a look at how both the functions are called. The in-place function takes a pointer to a pointer thus the call is InsertAtEndInPlace(&p, 2020) (we send the address to the pointer p using the & operator). In contrast, the other insert function takes as input a pointer of type Node and return a new variable pointing to the start of the list, which is why the call is p = InsertAtEnd(p, 1234) .
I personally like the in-place function (probably because it took me a heck of a long time to figure it out haha). The rest of the insertion functions in this tutorial are in-place.
Congrats for making it this far, you’re doing great. You deserve a break.
Awesome, now we move onto the remaining insertion functions starting with insertion at the start of the list.
Inserting at the start:
This logic here is that we create a new node tmp, initialize tmp.Data with the data to be inserted and assign to tmp.Next the value of the first node in the list *head . If the list is empty, we assign the address of tmp i.e. &tmp to *head making tmp the first node in the list.
Inserting at a specific position:
 Figure 2: The logic for inserting a new node at a specific position in the list.
To insert a node at a specific position, we first find the position by traversing the list. Once that position is found, we point the new node to the target node at position p and point the node before the target node to the new node. While iterating to the node at position p, if the iterator points to nil it means that we have reached the end of the linked list and the requested position is invalid. This logic is from lines 17–26 in the code snippet above.
There are a few edge cases here:
If
pis 1 then we insert the node at the start of the list. This is the same as the functionInsertAtStartwe looked at before. (Lines 7–12)If the insertion position
pis not 1 and the list is empty, thenpis invalid. (Lines 13–16)
Deletion:
A note about deletion in go:
Go is garbage collected. Variables that are unreachable are deleted by the garbage collector. Thus, any pointers to the struct must not reference it anymore. For illustration purposes, we will make the struct store its zero value as a replacement for the free() function from C. Note that even after making the struct store its zero value, it will not actually be deleted from memory. The deletion will only be done once there are no pointers pointing to the struct thus making it unreachable. Only after this will the garbage collector free the memory used by the struct. Another point to note is that once the garbage collector deletes the struct, the memory might not be released back to the OS. Go runtime preiodically returns large unused chunks of memory to the OS. This behavior can be forced through the use of the
runtime.debug.FreeOSMemory()function.
Deleting the first node:
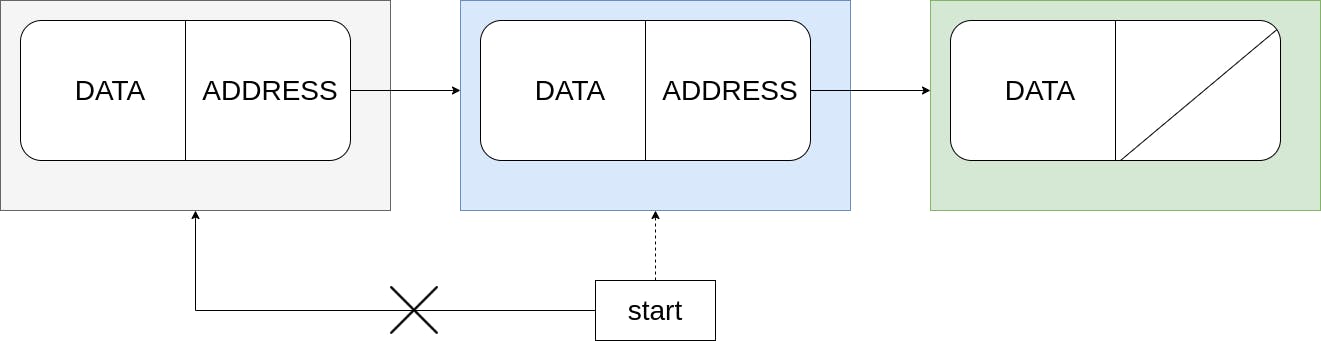 Figure 3: Logic for deleting the first node.
To delete the first node, all we need to do is change head to point to the next node via head.Next. Unlike C where we have free() to relinquish memory used by a variable, Go is garbage collected and there is no way to explicitly delete a variable from memory. To illustrate deletion, I explicitly assign the corresponding zero value to the fields of Node. This is for illustration only, in reality, zero values are valid values that can be assigned to variables. To actually delete Node we have to make it unreachable. We do this by removing any references to the Node. This logic can be seen from lines 10–18 in the snippet above.
But m8 what if I want to do this in-place eh?
This part is a bit tricky. Remember that the * operator is used to get the value that the pointer points to. Therefore to get the value that a pointer to a pointer points to (bear with me) the ** operator will need to be used.
Example:
a := 100
b := &a // b is of type *int
c := &b // c is of type **int

// Its simple enough to print the value of a
fmt.Println("a is ", a)

// This will print the value of a i.e. 100
fmt.Println("b points to the value ", *b)

// This will print the address of b something like 0xc1961246781
fmt.Println("c points to the value ", *c)

// To print 100 use ** operator
fmt.Println("Dereferencing the whole chain: ", **c)
The same logic is used in deleting the first node in-place. In the gist above,
headis the pointer to the pointer to the first node*headis the pointer to the first node**headis the first node
So we make the pointer to the first node i.e. *head point to the next node i.e. (**head).Next . Not so difficult now eh m8.
Deleting the last node:
 Figure 4: Logic for deleting the last node in the list.
To delete the last node, traverse to the penultimate node and change its Next field to nil . Super easy!!
In the code above, previous points to the penultimate node and current points to the last node after the loop at line 10 finishes execution.
Deleting an intermediate node:
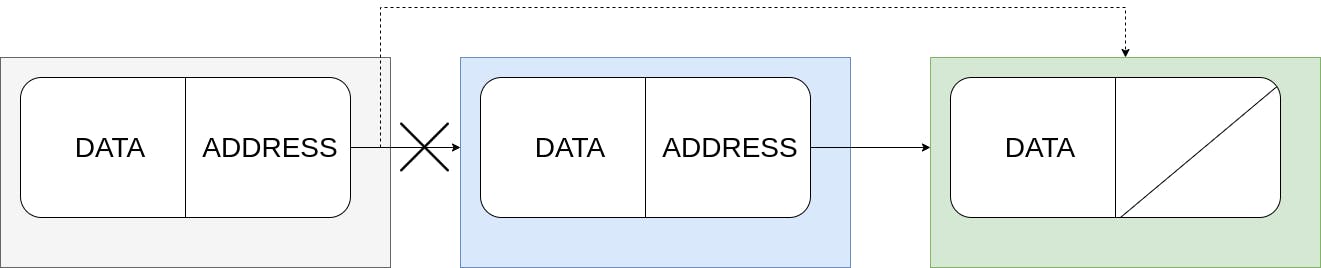 Figure 5: Logic for deleting an intermediate node in the list.
Here we borrow from the previous section. We use a 2 pointer strategy, one points to the current node and another that points to the node right before the current one. The pointers current and previous serve this purpose. The classic loop variable i is used to iterate until we reach the position p .
The ‘while’ loop at line 20 executes until we either reach the position p or we exceed the limits of the list (which means that the position is invalid). The deletion part is quite easy. All we need to do is change previous.Next to point to the node after the one at the position p which is current.next .
Delete the whole list:
To delete the whole list, traverse the list while removing all references to each node in the list.
And that’s all. You have reached the end of this tutorial.
To whoever is reading this, you're awesome 😎. It's really great that you stuck to the end. Great Job!!
You should now be able to:
Use functions, structs, and pointers in Go
Create linked lists
Traverse the linked list, find its length and print out the nodes in the linked list
Insert nodes into the linked list
Delete nodes from the linked list
Do in-place insertions and deletions
Understand the mechanism of deletion in Go
If you enjoyed reading this article or if it helped you in any way, a 👏 is appreciated. Do share this article with others who may be interested in the topic too.
Stay in touch with me on Linkedin and Twitter . Follow me on GitHub.