

Data Structures with Go - Part 2: Linked List Variants
Doubly Linked & Circular Linked Lists


All code from this tutorial can be found here.
NOTE: In this tutorial, we will be borrowing heavily from the last tutorial on linked lists. Do read that in case you missed it here.
After completing this tutorial you should be able to:
- Create doubly & circular linked lists
- Perform insertion, deletion, and traversal operations on both these variants.
Doubly Linked Lists
 Figure 1: Doubly linked lists have 2 pointers.
Each node in a doubly linked list has 2 pointers, one pointing to its next node and one to its previous node. The first node has its previous pointer set to null and the last node has its next pointer set to null.
And.. that's it basically.
Basic structure
In our definition, Prev points to the previous node and Next points to the next node in the list.
Traversal
Traversal and finding the length of a doubly linked list is the same as the singly linked version. Not much difference here.
Insertion
Inserting at the start:
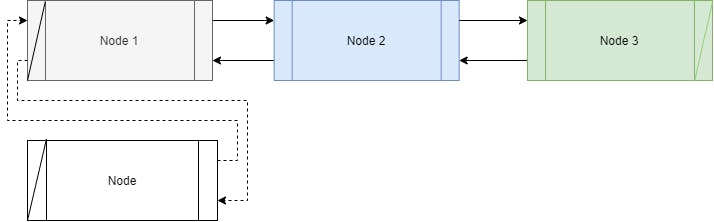 Figure 2: Inserting a new node at the start of the list.
Insertion at the start of the list is also the same as in the case of a singly linked list. The only addition is changing the pointer Prev of the current start node to point to the new node.
To make the code more readable, I now create new nodes using
&Node{}rather thanNode{}.
Inserting at the end:
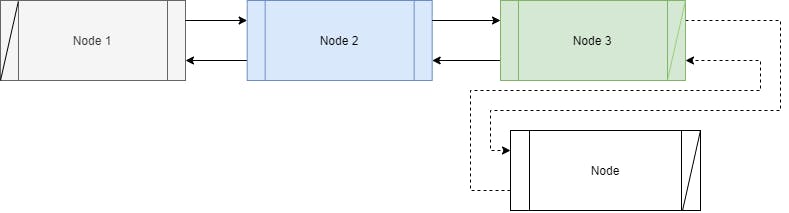 Figure 3: Inserting a new node at the end of the list.
This is similar to inserting nodes at the end of singly linked lists. The only addition is that the Prevpointer of the new node will now point to the last node of the list.
Inserting at a specific position:
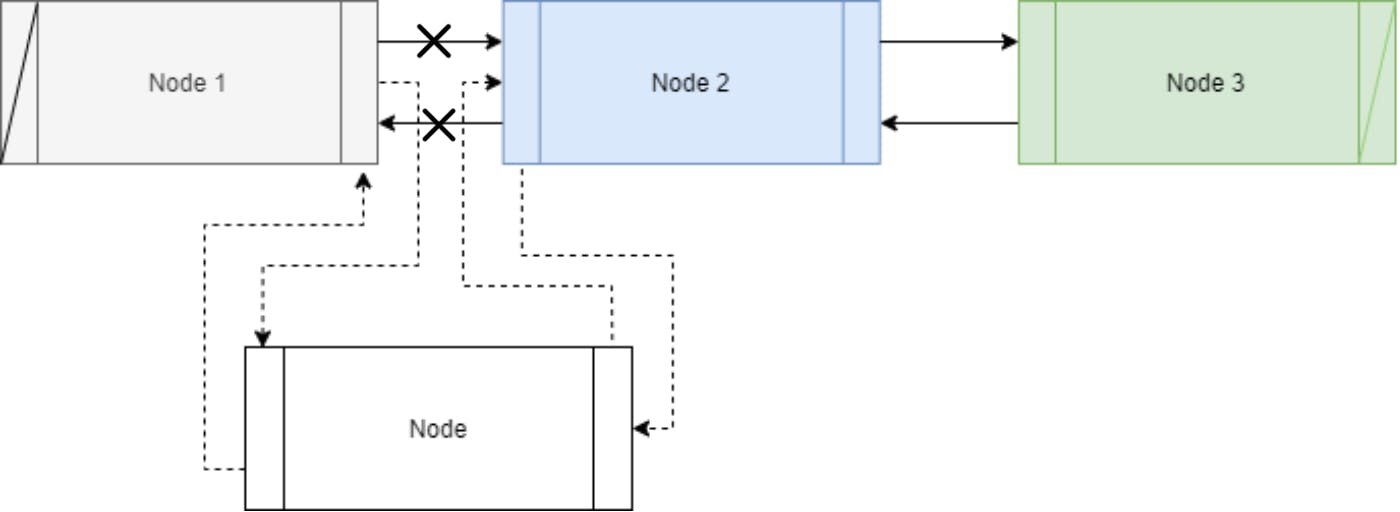 Figure 4: To insert the new node at a specific position, 4 pointers are changed.
Once again we borrow the strategy of finding a node at a specific position from singly linked lists. The new node is inserted before the current node at position p . After insertion, the new node is at position p and the node previously at p is now at the position p+1 .
4 pointers are changed when inserting a node at a specific position:
NewNode.Nextpoints to the node at positionpNewNode.Prevpoints to the node at positionp-1NodeAtP.Prevpoints to the new nodeNodeBeforeP.Nextpoints to the new node
Here we find the penultimate node (i.e. the one right before the insertion point. Penultimate here is with respect to the point of insertion.) which in this case is currentand change its Next pointer to point to the new node i.e. current.Next = tmp (line 34).
But before we do that, we need to change the Prev pointer of the node at position p i.e. current.Next.Prev to point to tmp. But we can’t do this if current.Nextis nil which it will be if the insertion point is at 1+Length of the list. Hence lines 31–34.
Putting together the functions above and executing would result in an output similar to the one below. Code for this sample execution is here.
Inserting &{1 <nil> <nil>} at the start
The list is: -> &{1 <nil> <nil>}

Inserting &{2 <nil> <nil>} at the end
The list is: -> &{1 <nil> 0xc00000c0a8} -> &{2 0xc00000c060 <nil>}

Inserting &{3 <nil> <nil>} at the end
The list is: -> &{1 <nil> 0xc00000c0a8} -> &{2 0xc00000c060 0xc00000c108} -> &{3 0xc00000c0a8 <nil>}

Inserting &{4 <nil> <nil>} at position 4
The list is: -> &{1 <nil> 0xc00000c0a8} -> &{2 0xc00000c060 0xc00000c108} -> &{3 0xc00000c0a8 0xc00000c180} -> &{4 0xc00000c108 <nil>}
Have a look at the Prev and Next addresses in the output above. It's very cool to see the actual addresses used by the nodes on the hardware.
Deletion
Deleting the first node:
In addition to moving the head pointer to the 2nd node as in the case of a singly linked list, we change the Prev pointer of the 2nd node to nil. Easy!!!
Deleting the last node:
The logic here is the same as a singly linked list. Find the penultimate node, change it's Next pointer to nil.
Deleting at a specific position:
 Figure 5: Logic for deleting a node at a specific position
Referring to the diagram above, let’s say we want to delete Node 2. All we need to do is change Node1.Next to point to Node 3 and change Node3.Prev to point to Node 1.
There are 5 edge cases we need to consider:
Deletion position < 1: These are invalid (Lines 3–5).
Empty list (Lines 8–10).
Deletion position is at the start of the list: In this case, we can reuse the
DeleteFirstfunction from the previous section (Lines 13–15).Deletion position exceeds the length of the list (Lines 26–28)
The node to delete is the last in the list: In this case, there is no node after and we can’t change
nextNode.Prevto point to thepreviousNode.
Note: Doubly linked lists have 2 pointers. Take care to change them both when inserting or deleting elements.
Deleting the entire list:
The logic is exactly the same as singly linked lists.
Borrowing some logic from singly linked lists.
Circular Linked Lists
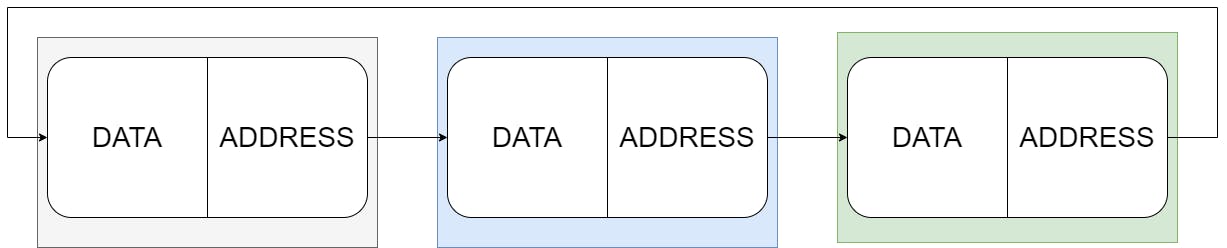 Figure 6: The last node points to the first making the list circular.
Circular linked lists don’t have an ‘end’ in the sense that there is no node that points to null. All nodes point to the next in line. The last node points back to the start of the list which makes the list circular.
We now look at the basic ops of circular linked lists.
Basic Structure:
The basic structure is exactly the same as a singly linked list.
There is always one node that points to the start of the list. This node is the last node in the list.
Traversal:
If there is no last node then how do we know when to stop the traversal loop??
We use a 2 pointer approach. One stays put pointing to the symbolic start of the list, the other is used to traverse the list. When the second pointer (current in this case) and the head point to the same node, we have successfully traversed the list.
This logic is used for both displaying the list as well as finding the length of the list.
Insertion
For any insertion op, we will in the worst case need to traverse the whole list. But why??
Inserting at the start: Need to change the last node to point to the new node at the start.
Inserting at the end: Need to find the last node, make it point to the new node & make the new node point to the start of the list.
Inserting at a specific position: If the insertion point is the start or the end of the list, we have to traverse the entire list anyways. If the insertion point is somewhere in between, only then will we not have to traverse the entire list.
Inserting at the start:
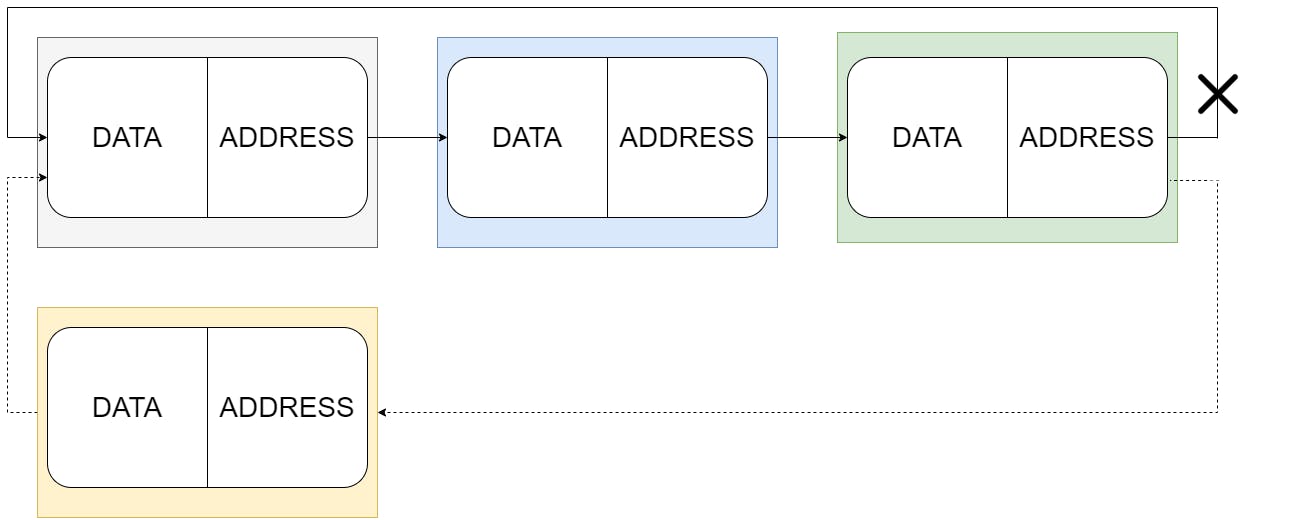 Figure 7: Make the last node point to the new one. Make the new node point to the start.
To insert a new node at the start, first find the last node using the 2 pointer approach. Then make the last node point to the new node and the new node point to the start of the list (Lines 11–16).
Inserting at the end:
 Figure 8: Make the new node point to the start of the list. Make the last node point to the new node.
The logic here is simple. Make the new node point to the start of the list. Find the last node (the last node always points to the start of the list). Make the last node point to the new node (Lines 10–16).
Inserting at a specific position:
The logic for inserting at a specific position is the same as the singly linked list.
As you see, a lot of the logic here is borrowed from or is the same as the previous article on singly linked lists.
Deletion:
Deleting from the start:
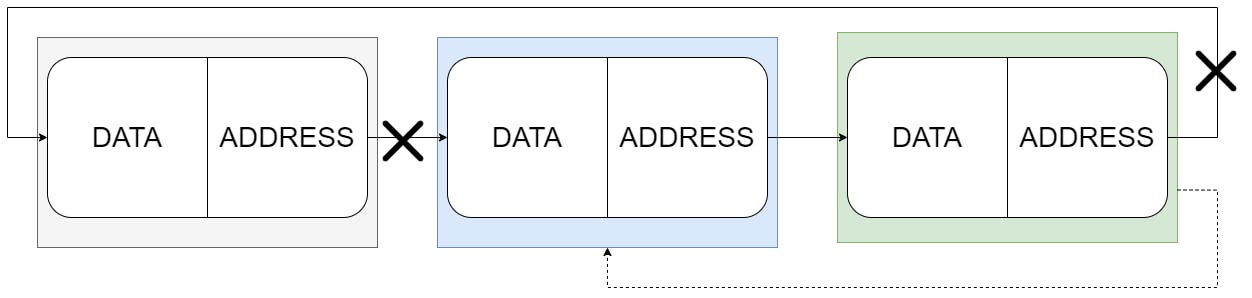 Figure 9: Make the last node point to the 2nd node in the list.
To delete the first node, find the last node, make it point to the 2nd node in the list and change the head to point to the second node.
Deleting the last node:
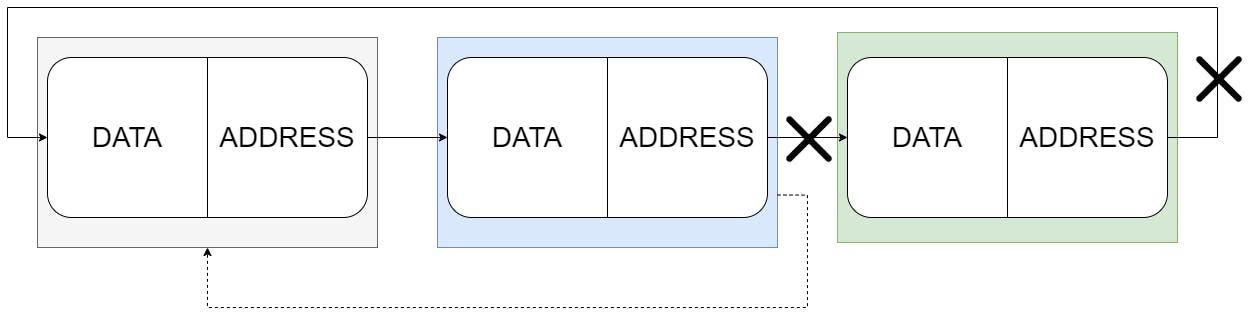 Figure 10: Change the penultimate node to point to the head.
To delete the last node, find the penultimate node and make it point to the first node in the list. Super easy!!!
Delete at a specific position:
The logic here too is the same as a singly linked list.
Deleting the entire list:
Just like singly and doubly linked lists, we use an auxiliary pointer to help traverse the list. And the similarities end there.
Here we change the Next pointer of each node to point to nil. This is to make sure that eventually there are no nodes that point to either themselves or to the start of the list. By doing this we make sure that the deletion loop is finite. Towards the end, the pointer aux will point to the first node in the list. But this time that node will point to nil and the block at lines 6–8 will cause the loop to exit.
A sample script to view the outputs of the insertion and deletion operations can be found here.
Putting insertion and deletion together would produce outputs like this:
Inserting &{1 0xc00018a190} at the start
The list is:  -> &{1 0xc00018a190}

Inserting &{2 0xc00018a1c0} at the end
The list is:  -> &{1 0xc00018a1c0} -> &{2 0xc00018a190}

Inserting &{3 0xc00018a200} at the end
The list is:  -> &{1 0xc00018a1c0} -> &{2 0xc00018a200} -> &{3 0xc00018a190}

Inserting &{4 0xc00018a250} at the position 4
The list is:  -> &{1 0xc00018a1c0} -> &{2 0xc00018a200} -> &{3 0xc00018a250} -> &{4 0xc00018a190}

Deleting first Node:  &{1 0xc00018a1c0}
The list is:  -> &{2 0xc00018a200} -> &{3 0xc00018a250} -> &{4 0xc00018a1c0}

Deleting last node:  &{4 0xc00018a1c0}
The list is:  -> &{2 0xc00018a200} -> &{3 0xc00018a1c0}

Deleting &{3 0xc00018a1c0} at position 2
The list is:  -> &{2 0xc00018a1c0}

Deleting first Node:  &{2 0xc00018a1c0}
The list is: empty.
Pay attention to the addresses. Every new node when initialized points to itself. When inserted in the list, it points to the first node in the list. When deleting the addresses are changed accordingly to point to the next node in the list (which would be the first node for the node at the end of the list).
You should now be able to:
Create doubly & circular linked lists
Perform insertion, deletion, and traversal operations on both the list types
If you enjoyed reading this article or if it helped you in any way, a 👏 is appreciated. Do share this article with others who may be interested in the topic too.
Stay in touch with me on Linkedin and Twitter . Follow me on GitHub.